
Check hidden files in cPanel file manager, there are often critical files that are hidden from view by default. These hidden files, known as “dotfiles” due to their names beginning with a dot (e.g., .htaccess, .env), play a crucial role in your website’s configuration, security, and functionality. Whether you’re a seasoned developer or a website owner looking to make specific adjustments, accessing these hidden files can be essential.
cPanel, one of the most popular web hosting control panels, provides a user-friendly File Manager that allows you to easily manage your website’s files. However, by default, it may not display these hidden files. In this guide, we will walk you through the simple steps to reveal and manage these hidden files in cPanel’s File Manager, ensuring you have full control over your website’s environment.
Step-by-Step Guide to Viewing Hidden Files in cPanel File Manager
Log In to Your cPanel Account:
Begin by logging into your cPanel account. This can typically be done by entering yourdomain.com/cpanel in your web browser and then entering your cPanel username and password. If you’re unsure of the login details, these are usually provided by your web hosting provider.

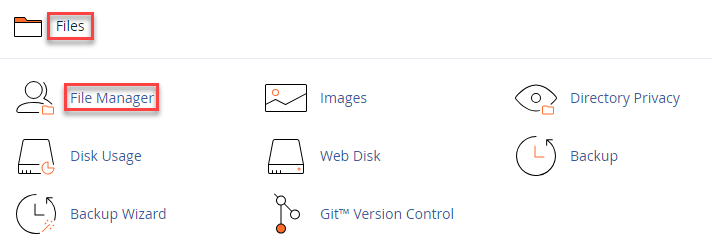
Access the File Manager:
Once you’re inside your cPanel dashboard, you’ll see a variety of icons representing different tools and features. To manage your website’s files, look for the File Manager icon, which is usually found under the “Files” section. Click on it to open the File Manager interface.
Adjust File Manager Settings to Show Hidden Files:
The File Manager, by default, may not display certain files, especially those that are considered “hidden.” These hidden files typically start with a dot (.)—for example, .htaccess, .env, .git, etc. These files are often crucial for your website’s configuration but are hidden to prevent accidental deletion or modification. To make sure these hidden files are visible:
- Look towards the upper right-hand corner of the File Manager window, and click on the Settings button. This button is usually represented by a gear icon.

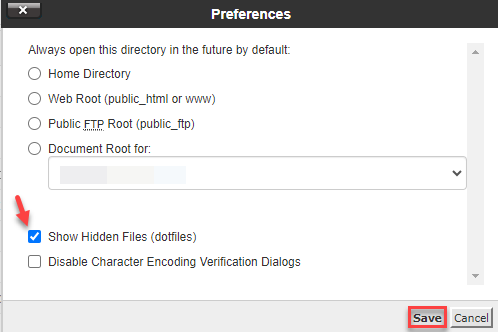
- A pop-up window titled Preferences will appear. In this window, you’ll see an option labeled “Show Hidden Files (dotfiles)”. This option is typically accompanied by a checkbox.
- Enable Hidden Files:
- To view hidden files, simply check the box next to “Show Hidden Files (dotfiles)”.
- After selecting this option, click the Save button at the bottom of the pop-up window.
Check hidden files in cPanel file manager
Once you’ve enabled the display of hidden files, the File Manager will refresh, and Check hidden files in cPanel. you’ll now see all files, including those that were previously hidden. These files might be located in the root directory of your website or within specific folders. You can now view, edit, or manage these files as needed, just like any other file in your File Manager.
Why Viewing Hidden Files Might Be Important
Check hidden files in cPanel website’s directory can play critical roles in the functionality and security of your site. For example:
- .htaccess: This is a powerful configuration file that can control access to your site, redirect URLs, and more.
- .env: This file might contain environment variables, which are often used to manage database credentials, API keys, and other sensitive information.
By enabling the display of hidden files, you gain complete control over your website’s environment, can check hidden files in cPanel and troubleshoot issues, optimize performance, or implement security measures. However, it’s important to handle these files with care, as incorrect modifications can lead to significant problems on your site.
After check hidden files in cPanel, If you ever need to hide these files again, simply revisit the Settings in File Manager and uncheck the “Show Hidden Files (dotfiles)” option.


