Install WordPress via Softaculous in cpanel, WordPress is one of the most popular content management systems (CMS) with hosting provider due to its ease of use and versatility. If you’re using cPanel, installing WordPress becomes incredibly simple with the help of Softaculous, an application installer that automates the process. In this guide, I’ll walk you through how to install WordPress through Softaculous in cPanel.
Step-by-Step Guide
Prerequisites:
- Access to your cPanel account
- A domain name pointed to your web hosting
- Hosting with cPanel and Softaculous installed (Most web hosts offer this by default)
Step 1: Log in to cPanel
- Access your cPanel account: To log in to your cPanel, enter your domain name followed by
/cpanel(e.g.,www.yourdomain.com/cpanel) in your browser’s address bar. - Login using your credentials: Enter your cPanel username and password provided by your web host. Once logged in, you’ll be directed to the cPanel dashboard.

Step 2: Find Softaculous App Installer
- Locate the Softaculous app installer: In the cPanel dashboard, scroll down to the Software section. You’ll see the Softaculous Apps Installer icon.
- In some cPanel layouts, you may find it under the Scripts or Auto Installers section.

- Click on the Softaculous icon to open the app installer.
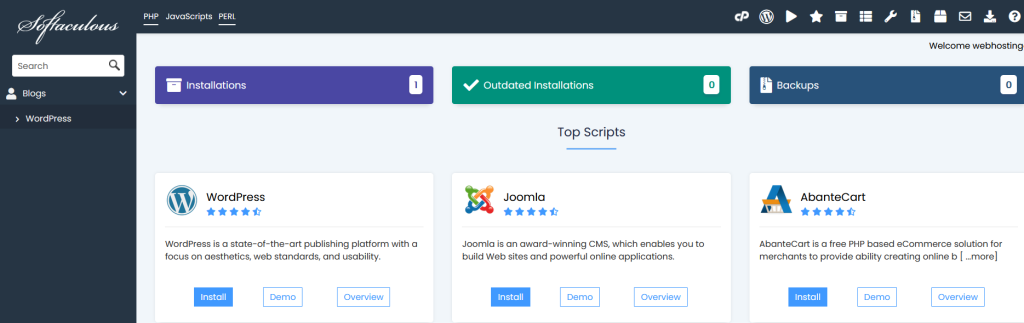
Step 3: Search for WordPress
- Find WordPress in Softaculous: Once you’re inside the Softaculous dashboard, you’ll see a list of available scripts. On the left-hand side menu, under the Blogs category, click on WordPress.
- Alternatively, use the search bar at the top right corner to quickly locate WordPress.
Step 4: Start the Installation Process
- Click the “Install” button: On the WordPress installation page, click on the blue Install Now button. This will start the WordPress installation process.

Step 5: Software Setup
- Choose protocol: You’ll need to choose between
http://andhttps://. If you have an SSL certificate installed, it’s recommended to choosehttps://. Otherwise, stick tohttp://. - Select the domain: Choose the domain where you want to Install WordPress via Softaculous from the dropdown menu. If you have multiple domains, select the appropriate one.
- Directory (optional): If you want to Install WordPress via Softaculous in a subdirectory (e.g.,
www.yourdomain.com/blog), enter the folder name here (likeblog). Leave it blank if you want to install WordPress directly on your domain’s root (e.g.,www.yourdomain.com).

Step 6: Site Settings
- Site name and description: You can customize your site’s name and description in this section. This can be anything you want, and you can change it later from the WordPress dashboard.
- Site Name: E.g., “My Blog.”
- Site Description: E.g., “A blog about travel and photography.”
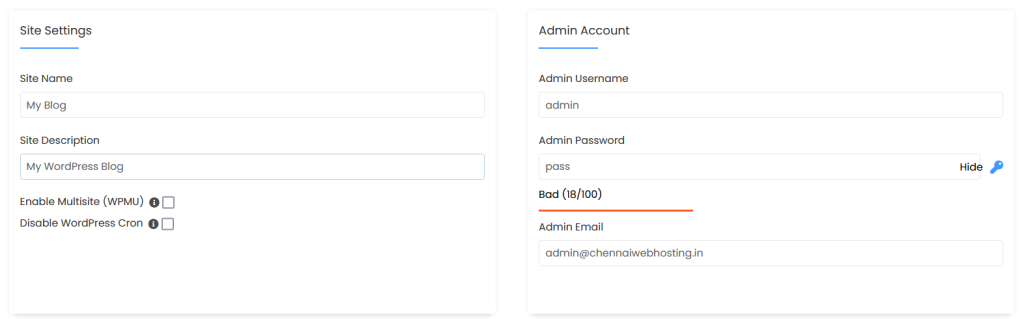
- Enable Multisite (WPMU): Leave this unchecked unless you specifically want to run a WordPress Multisite installation.
Step 7: Admin Account Setup
- Admin username and password: Choose a strong username and password for your WordPress admin account. Avoid using “admin” as the username for security reasons.
- Admin email: Enter a valid email address that will be used for site administration. Make sure you have access to this email in case you need to reset your password.
Step 8: Choose Language
- Select your preferred language: Choose the language in which you want Install WordPress via Softaculous. English is the default option, but you can pick from many other languages in the dropdown menu.

Step 9: Select Plugins and Theme
- Select theme (optional): Softaculous may offer you a selection of free themes to install right away. You can either choose one or skip this step and pick a theme later from the WordPress dashboard.

Step 10: Advanced Options (Optional)
- Database settings: Softaculous will automatically generate a database and table prefix for you. If you are an advanced user, you can change these settings.
- Auto upgrade: You can enable the option for Softaculous to automatically update your WordPress installation and plugins when a new version is available. This is recommended for security purposes.

Step 11: Install WordPress via Softaculous
- Click “Install”: Once you’ve reviewed all the settings, click the Install button at the bottom of the page. Softaculous will begin Install WordPress via Softaculous. The process usually takes a minute or two.

- Wait for the confirmation: After Install WordPress via Softaculous is complete, you’ll see a message that includes your WordPress admin URL and credentials. This URL will look something like
www.yourdomain.com/wp-admin, and this is where you’ll log in to manage your WordPress site.
Step 12: Access Your WordPress Site
- Log in to WordPress: To log in to your new WordPress site, navigate to the admin URL (
www.yourdomain.com/wp-admin) provided after installation. - Enter your admin username and password to access the WordPress dashboard and start customizing your site.

Install WordPress via Softaculous in cPanel is a fast and straightforward process, requiring only a few minutes. Once WordPress is installed, you can begin adding themes, plugins, and content to create the website of your dreams. Be sure to keep your WordPress installation and plugins updated to ensure optimal performance and security.