
Take Backups In Webuzo, Its a powerful and user-friendly web hosting control panel that simplifies the management of web applications, websites, and databases. One of the key aspects of maintaining a reliable hosting environment is ensuring that backups are taken regularly, as they safeguard against data loss and provide an efficient way to restore your system in case of failure or unexpected issues. Backups in Webuzo can be easily managed through the control panel, offering both manual and automated options for users. By utilizing the backup feature, users can save critical information related to their installed applications, databases, and configurations, allowing for quick restoration when needed.
To take a backup in Webuzo, users first log in to the admin or user panel and navigate to the “Backup/Restore” section. From here, they can select the specific application they wish to back up, initiate the backup process, and download the backup file to their local machine if desired. Additionally, Webuzo allows users to set up automated backups using cron jobs, ensuring that regular backups are performed without manual intervention. This feature is especially useful for those running critical websites or applications, as it ensures that their data is continuously protected. Whether performed manually or automatically, backups in Webuzo offer peace of mind by keeping data secure and easily restorable, enhancing the overall reliability of the hosting environment.
Taking backups in Webuzo is an important step to ensure the security and integrity of your data.
Here’s how you can take backups in Webuzo:
1. Login to Webuzo Panel
- Access your Webuzo Admin Panel by navigating to
http://yourdomain.com:2087(admin panel) orhttp://yourdomain.com:2087(user panel). - Enter your login credentials.

2. Navigate to the Backup Section
- Once logged in, go to the “Backup” option under the “Server utilities” section in the left-hand sidebar.

3. Select the Backup

- Click on the “Backup Now” button
- Webuzo will navigate to Backup Configuration
4. Backup Configuration
- You will get the option to select the server where you want to take the backup. If you have added a remote server to take backup, you will have to select the remote server in front of the drop-down. Here, we have selected a local server to take backup.
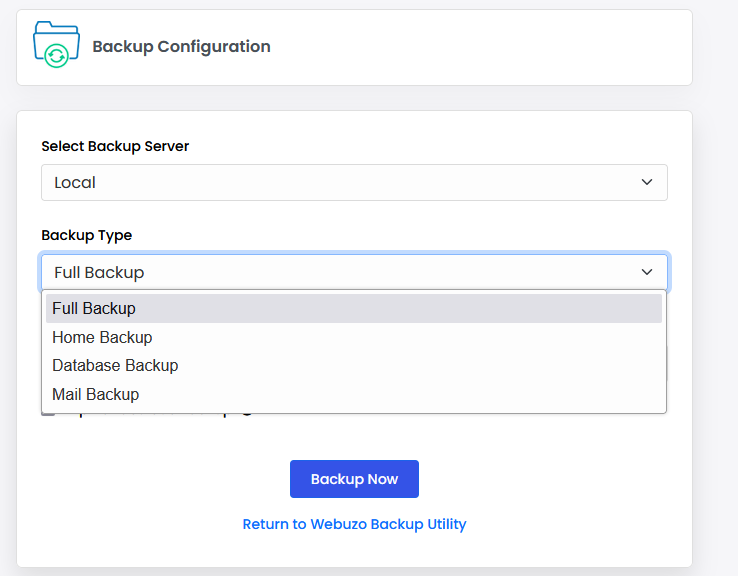
Backup Type
i) Full Backup – to take a complete backup of the webuzo control panel. A full backup will take the backup of the following files.
- User Home Directory
- Domains
- Cronjobs
- User Databases (If MySQL is installed)
- Mail Files (If Exim is installed)
- DNS files (If BIND is installed)
ii) Home Backup – Select this option to take a backup of the website’s home directory/root directory.
iii) Data Backup- Select this option to take a database backup.
vi) Mail Backup– Select this option to take the email backup.
5.Take Backups In Webuzo
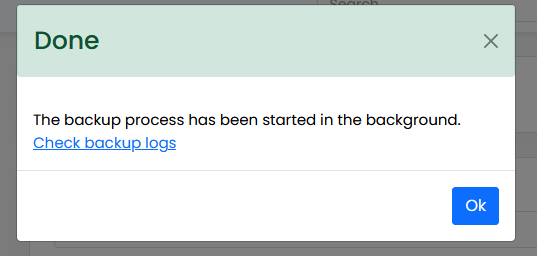
click the “Backup Now” button to create the backup

Once the backup process is started, you will get a pop-up “The backup process has been started in the background Check backup logs.”
6. Download Backup (Optional)
- After Take Backups In Webuzo, you can choose to download it to your local machine for safekeeping.
- Navigate to “System Backup”

- And select the “Download” option for your backup file.

7. Restoring from Backup
- If you need to restore a backup, go to the “System Backup” section, find the backup file Take Backups In Webuzo, and click on “Restore icon” next to the desired backup.
This method ensures that your data, settings, and configurations are safely stored and can be easily restored if needed from Take Backups In Webuzo.

